 Power Banks


 Brother Printers


 IP PBXs



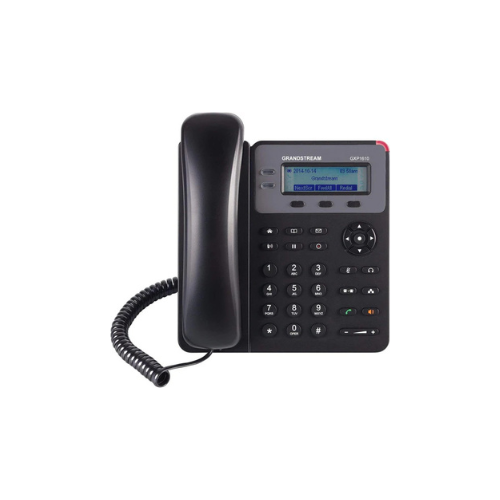

Grandstream GXP1610P 2-Line Basic IP Phone
Key Features
Brand: Grandstream
1 SIP account, up to 2 call appearances
TLS and SRTP security encryption technology to protect calls and accounts
3-way audio conferencing for easy conference calls
Electronic Hook Switch (EHS) support for Plantronics headsets
Automated provisioning options include TR-069 and XML config files
Full-duplex speakerphone with HD audio to maximize audio quality and clarity
Use with Grandstream’s UCM series of IP PBXs for Zero Config provisioning
Built-in PoE 802.3af to power the device and give it a network connection
1 Year Warranty
Grandstream GXP1610P Basic IP Phone Review and Technical Overview
The Grandstream GXP1610P is a reliable, user-friendly basic IP phone designed for small businesses, home offices, and common workspace areas. Engineered to deliver essential Voice over Internet Protocol functionality, this two-line device provides clear audio communication and simple integration into hosted enterprise telephone networks. This comprehensive guide details the core product features, hardware specifications, and system installation steps.
Premium Design and Key Features
Clear Graphic Display Screen
The phone incorporates a 132 by 48 pixel black and white graphical liquid crystal display panel. This display screen provides clear visibility for daily calling operations, neatly organizing caller identification, date and time parameters, active call timers, and system messages for easy reading.
Essential Line and Call Handling Efficiency
Built for standard office communication environments, the hardware features a single Session Initiation Protocol account and supports up to two concurrent call appearances. Dual physical line keys allow users to manage a current conversation while holding a second incoming call or transferring an active line.
Multi Purpose Context Sensitive Soft Keys
Three programmable context-sensitive soft keys sit right below the main screen panel. These buttons automatically update their operational functions based on the current state of the phone, granting rapid access to features like call transfer, conferencing, or hold options without manual menu tracking.
High Definition Audio Quality and Local Security
Both the lightweight handset and the full-duplex speakerphone circuits utilize advanced wideband processing to deliver clear voice communication. The phone firmware incorporates a large three-way audio conferencing system to simplify remote collaboration, alongside carrier-grade data encryption to secure business conversations.
Technical Specifications
Display Screen: 132 by 48 Pixel Black and White Graphical LCD Screen
Line Capacity: 1 Session Initiation Protocol Account, 2 Call Appearances
Network Ports: Dual Switched Auto Sensing 10/100 Mbps Ethernet Ports
Power Hardware: Integrated Power over Ethernet Support
Audio Quality: Full Duplex Speakerphone with Acoustic Echo Cancellation
Call Memory: Up to 1000 Phonebook Contacts and 200 Call Logs Records
Physical Keys: 2 Line Keys, 3 Soft Keys, 5 Navigation Keys, 13 Dedicated Keys
Security Engine: Layer 2 Media Access Control and Layer 3 Transport Security
Line Capacity: 1 Session Initiation Protocol Account, 2 Call Appearances
Network Ports: Dual Switched Auto Sensing 10/100 Mbps Ethernet Ports
Power Hardware: Integrated Power over Ethernet Support
Audio Quality: Full Duplex Speakerphone with Acoustic Echo Cancellation
Call Memory: Up to 1000 Phonebook Contacts and 200 Call Logs Records
Physical Keys: 2 Line Keys, 3 Soft Keys, 5 Navigation Keys, 13 Dedicated Keys
Security Engine: Layer 2 Media Access Control and Layer 3 Transport Security
Step-by-Step Installation Guide
Hardware Assembly and Base Stand Mounting
-
- Turn the phone casing over to view the base installation slots on the bottom panel.
- Insert the top tabs of the phone stand into the upper or lower slots to select your preferred desktop viewing tilt angle.
- Plug the straight end of the coiled handset cord into the phone jack marked with a physical handset icon.
- Insert the opposite end of the coiled cable firmly into the base socket of the handset piece.
Network and Power Configuration
Step 1: Connecting the Network Line
-
- Locate your building wall Ethernet data jack or an open LAN port on your local internet router.
- Connect a standard Ethernet network cable from that active network port into the LAN jack on the back panel of the phone.
- Route a secondary network cable from the phone PC port over to your desktop computer tower to share the internet line if necessary.
Step 2: Powering Up the Device via PoE
- The GXP1610P features built-in Power over Ethernet circuitry to pull energy directly over the network wire.
- Ensure the opposite end of your network LAN cable links to a Power over Ethernet switch port.
- The graphical display screen will illuminate and begin loading the phone operational firmware files immediately once power passes through.
- An optional external 5V power adapter can also be used if your local area network does not utilize a Power over Ethernet switch setup